Last Updated on February 16, 2025 by April

White rocks can transform your outdoor space into a stunning, low-maintenance landscape that stands out in any neighborhood. These versatile elements add texture, contrast, and visual interest while reducing the need for constant upkeep.
You can achieve professional-looking results with white rocks by selecting the right sizes, creating defined borders, and combining them strategically with plants and other hardscape materials. Proper planning and installation techniques ensure your white rock landscaping stays beautiful and functional for years to come.

1) Incorporate curved pathways
Create gentle curves in your white rock pathways to add visual interest to your landscape design. A winding path feels more natural and inviting than straight lines.
You can outline your curved pathway with larger white rocks or pavers to define its edges clearly. Add small white pebbles between the borders for a clean, polished look.

2) Use a variety of white rock sizes
Mixing different sizes of white rocks creates visual interest in your landscape. Small pebbles can fill gaps between larger stones, while medium-sized rocks provide a stable foundation.
Adding larger white rocks as focal points draws attention to specific areas of your garden. You can place these statement pieces near plants or water features.
Layer your rock sizes strategically, with larger stones at the bottom and smaller ones on top. This arrangement prevents smaller rocks from sinking into the soil over time.

3) Combine white rocks with plants
White rocks create a striking backdrop for plants. The stark contrast between the pale stones and vibrant green plants adds visual interest to your garden design.
Plants can be placed in small clusters among the rocks and you can use both large and small varieties to create depth and dimension.
Select low-maintenance plants like Echeveria or Sedum, as they thrive in rocky environments. These plants require minimal water and care while providing year-round color.

4) Create a border using stones
Select white rocks to form a sturdy border. Position these stones along the edges of your landscaping area, nestling them slightly into the soil for stability.
Make sure each stone sits firmly in place by gently pressing it into position. You can angle the rocks slightly inward toward your landscaping area to prevent them from shifting outward.

5) Add contrast with dark mulch
Dark mulch creates a striking visual contrast against white rocks in your landscape. You can use black or deep brown mulch to define borders and highlight specific areas.
Place the dark mulch in beds adjacent to your white rock areas to create clear boundaries. The stark difference between the two materials will make your landscape design more dynamic.
Choose organic mulches like pine bark or dyed hardwood for the best contrast. These materials maintain their dark color and provide additional benefits to your soil.

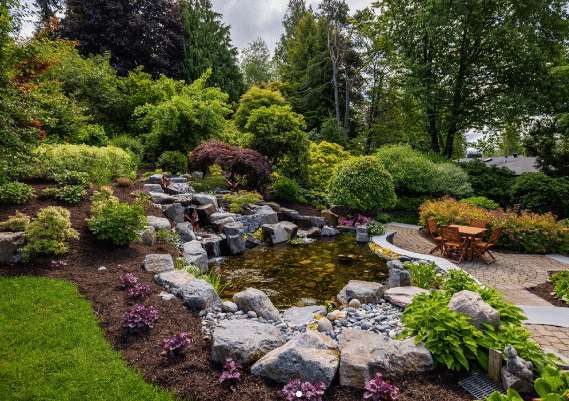
6) Utilize white rocks for water features
White rocks create stunning water features in your landscape. Place them around fountains or ponds to form natural-looking borders and catch water splashes.
You can layer different sizes of white rocks in waterfalls to create visual interest. Small pebbles work well for gentle water flow, while larger stones provide dramatic cascading effects.
Add white rocks to the bottom of clear water features to reflect light and create a bright, clean appearance. The stones’ pale color makes the water appear more pristine and inviting.
7) Design Zen gardens with white & gray pebbles
White pebbles form the foundation of a serene Zen garden. Use them to create rippling patterns that mimic water or waves.
Position your white pebbles in concentric circles around larger rocks or garden elements. Rake them regularly to maintain clean lines and fresh patterns.
Choose pebbles between 1/2 inch to 1 inch in diameter for the best visual effect. This size allows for easy raking while maintaining the peaceful aesthetic of your Zen space.

8) Highlight focal points with white stones
White rocks draw attention to key features in your landscape. Place them around sculptures, water features, or specimen plants to create eye-catching focal points.
You can use larger white stones to frame garden pathways or line the edges of flower beds. This technique guides the eye naturally through your garden design.
Choose stones sized 2-3 inches in diameter for most focal point applications. Smaller stones may get lost visually, while larger ones can overwhelm delicate landscape features.

9) Mix white and darker stones for depth
Create visual interest by combining white rocks with darker stones like slate or river rock. The contrast adds dimension to your landscape design.
You can layer different sizes of white and dark stones to create natural-looking transitions. Place larger stones as focal points and use smaller stones to fill spaces between them.
Consider using dark gray or black stones alongside bright white rocks to maximize the dramatic effect while maintaining a sophisticated appearance.

10) Edge a garden bed with rock outlines
Place white rocks along your garden bed’s perimeter to create a clean, defined border. Select rocks that are 4-6 inches in diameter for the best visual impact.
Dig a shallow trench about 2 inches deep around the bed’s edge. Set the rocks side by side in the trench, ensuring they sit level with each other.
Pack soil firmly around the base of each rock to secure them in place. This prevents shifting and maintains the border’s neat appearance over time.


